Explanation of Pre- and Post-Assessment Instrument
Pre-Assessment: My co-teacher, Emily, and I used group discussions with students at the beginning of each lesson to assess if students had prior knowledge on the tools and techniques of the materials, key concepts and vocabulary related to the lesson, and the background of the professional artists we were referencing. We felt that a discussion would be a more appropriate pre-assessment tool for second and third grade students rather than a written test or reflection because our students had an easier time articulating their thoughts verbally rather than with writing (they were still learning sentence structure and spelling). Dialogue not only encouraged students to "think aloud" about art, but it also helped them practice critical discussion skills with their peers when examining work. During work time, in-progress check-ins between us and the students also helped us gage where students were with their prior knowledge on the lesson. Our assessment of prior knowledge was not only based on how well they could articulate the art-making process with us, but how often they took the initiative to explain it to their other classmates that struggled a bit more.
Sketchbook ideation was another example of pre-assessing students' prior knowledge, particularly when it came to technical drawing skills and planning for ideas. The criteria for evaluating the students' ideation work is in our rubric, which is discussed in the post-assessment section.
Post-Assessment: We created a rubric for each of our lessons that measured each student in three categories:
It is important to note that while we did include an assessment for ideation in the pipe cleaner lesson plan, we did not evaluate students on this part of the assignment. This is because we only had one day to complete the assignment, so we wanted to make sure they had enough time to work on their final project as possible. If we had more days, we would've given students more time during class to plan out the designs for their animals in their sketchbooks.
Sketchbook ideation was another example of pre-assessing students' prior knowledge, particularly when it came to technical drawing skills and planning for ideas. The criteria for evaluating the students' ideation work is in our rubric, which is discussed in the post-assessment section.
Post-Assessment: We created a rubric for each of our lessons that measured each student in three categories:
- creative thinking, decision making and problem-solving (ideation)
- demonstrating skill development and understanding (tools and techniques; expressive features and inherent characteristics)
- reflection (critical reflection)
It is important to note that while we did include an assessment for ideation in the pipe cleaner lesson plan, we did not evaluate students on this part of the assignment. This is because we only had one day to complete the assignment, so we wanted to make sure they had enough time to work on their final project as possible. If we had more days, we would've given students more time during class to plan out the designs for their animals in their sketchbooks.
| polaris_rubrics_.docx |
Assessment Instruments
Formative:
Sketchbooks: The sketchbooks were the resource students used for the ideation stage of their lesson. This aspect of the assessment mainly helped us determine what students already knew when it came to visually planning out their ideas for each lesson and what kind of technical drawing skills they needed assistance on. For example:
Blog: Our blogs demonstrated student growth on a weekly basis by capturing photos and quotes of the students during the art-making process. The blog was not only imperative for determining if the students met the objectives of our assignment. It also captured the students' a-ha moments and their ability to engage and persist through challenges. The blog gave us a visual representation of what went well during the lesson, and what kinds of things we could potentially tweak in the future.
Individual and Group Discussions: These were the most important resources we had for determining what students already knew about the technical and conceptual aspects of each lesson, and what specifically they needed a lot of assistance with. One-on-one discussions with students during class time gave us some perspective on which students needed a lot more individualized attention and which students had an easier time thinking independently. This was also the time when we saw students taking initiative to help other classmates that were stuck. For example, during our quilted partner portrait lesson, we had a couple of students volunteer to teach their table mates how to draw a nose and a mouth, even though Emily and I offered our insights.
Group Discussions at the beginning of the lesson helped us determine if students were familiar with the materials they were going to be working with, the concepts they would be integrating into their work, key vocabulary terms relevant to the assignment, and the professional artists we showed that were relevant to our lesson. Though all of our pre-assessment questions are detailed in the pre-assessment and instruction sections of our lesson plans, here are some examples of pre-assessment questions we asked the students:
Summative:
Rubric: As stated in the previous section, the rubric helped us determine how successfully students applied discussions and demonstrations on tools/techniques and expressive features/inherent characteristics of art materials into their final products. Students that scored higher points demonstrated a strong understanding of materials, how clearly they articulated their concept from their sketchbooks onto their final projects, and took risks when it came to materials exploration.
Gallery Walk and Reflective Activity: On the last day of our unit, we took students through the exhibition of all their work. They had to fill out a worksheet called "The Art Sandwich" that taught them how to identify strengths and improvements in each person's work based on how they used line, shape, and color. After the gallery walk, we arranged students in a circle and had them explain what they liked about each persons' work, and also which lesson they enjoyed the most. Though students seemed to like all three lessons for various reasons, the stamp lesson seemed to be the most popular because the students had never tried printmaking before. The quilt lesson came in second because students got a chance to work with watercolors and warm/cool color schemes. Students probably would've enjoyed the pipe cleaner lesson more if they had more days to work on their lesson, though some students appreciated creating a 3-D animal.
Sketchbooks: The sketchbooks were the resource students used for the ideation stage of their lesson. This aspect of the assessment mainly helped us determine what students already knew when it came to visually planning out their ideas for each lesson and what kind of technical drawing skills they needed assistance on. For example:
- For the stamp lesson, we assessed if students knew how to make a thumbnail sketch, could scale down larger and more complex drawings into a smaller size, could simplify details in their thumbnail sketches to make carving easier in the final block, and understood that the block would print a reversed image of their drawing and should plan accordingly for it.
- For the quilted partner portrait lesson, we assessed if students understood how to draw each facial features with relatively correct proportions. We let them draw a face first before we showed them how to do it, mainly because they were more infatuated with jumping in and creating art rather than sitting through a demonstration.
- For the pipe cleaner lesson plan, we assessed if students understood how to create a gesture drawing of a cat so they knew how to build a gestural skeletal form with pipe cleaners. Because students did not have time to create gesture drawings of their pipe cleaner animals, we did not factor these scores into the final graph. This is because we felt that the students creating a gesture drawing from the same cat photo did not accurately demonstrate student growth between the pre- and post-assessments.
Blog: Our blogs demonstrated student growth on a weekly basis by capturing photos and quotes of the students during the art-making process. The blog was not only imperative for determining if the students met the objectives of our assignment. It also captured the students' a-ha moments and their ability to engage and persist through challenges. The blog gave us a visual representation of what went well during the lesson, and what kinds of things we could potentially tweak in the future.
Individual and Group Discussions: These were the most important resources we had for determining what students already knew about the technical and conceptual aspects of each lesson, and what specifically they needed a lot of assistance with. One-on-one discussions with students during class time gave us some perspective on which students needed a lot more individualized attention and which students had an easier time thinking independently. This was also the time when we saw students taking initiative to help other classmates that were stuck. For example, during our quilted partner portrait lesson, we had a couple of students volunteer to teach their table mates how to draw a nose and a mouth, even though Emily and I offered our insights.
Group Discussions at the beginning of the lesson helped us determine if students were familiar with the materials they were going to be working with, the concepts they would be integrating into their work, key vocabulary terms relevant to the assignment, and the professional artists we showed that were relevant to our lesson. Though all of our pre-assessment questions are detailed in the pre-assessment and instruction sections of our lesson plans, here are some examples of pre-assessment questions we asked the students:
- Lesson 1:
- Lesson 2: How does working with more than one material add to the expression of a portrait? What are the parts of a face that make up a portrait? How do warm and cool color schemes express emotion related to a person's identity? What are the similarities and differences of artwork that has a single image versus multiple images?
- Lesson 3: What is the difference between two-dimensional art and three-dimensional art? What materials can we use to make a three-dimensional shape? What can we do to the material to make it stand on its own? How can drawing help us plan to make a sculpture? How can we build sculptures using pipe cleaner wire?
Summative:
Rubric: As stated in the previous section, the rubric helped us determine how successfully students applied discussions and demonstrations on tools/techniques and expressive features/inherent characteristics of art materials into their final products. Students that scored higher points demonstrated a strong understanding of materials, how clearly they articulated their concept from their sketchbooks onto their final projects, and took risks when it came to materials exploration.
Gallery Walk and Reflective Activity: On the last day of our unit, we took students through the exhibition of all their work. They had to fill out a worksheet called "The Art Sandwich" that taught them how to identify strengths and improvements in each person's work based on how they used line, shape, and color. After the gallery walk, we arranged students in a circle and had them explain what they liked about each persons' work, and also which lesson they enjoyed the most. Though students seemed to like all three lessons for various reasons, the stamp lesson seemed to be the most popular because the students had never tried printmaking before. The quilt lesson came in second because students got a chance to work with watercolors and warm/cool color schemes. Students probably would've enjoyed the pipe cleaner lesson more if they had more days to work on their lesson, though some students appreciated creating a 3-D animal.
Pre-and Post-Assessment Results
These graphs chart the growth of all our students between the pre-assessment and the post-assessment of all three of their lessons. Each of their final scores for each lesson were added up for a final total score, which was applied into these graphs. To provide quantitative data for student growth in the pre-assessment, we tallied their creative thinking, decision making and problem-solving (ideation) scores of each student using the rubric. This is because we did not have number-based data to assess student knowledge from the group discussions we had about each lesson. The post-assessment charted the total scores of each lesson from the other two categories: demonstrating skill development and understanding (tools and techniques; expressive features and inherent characteristics) and reflection (critical reflection).
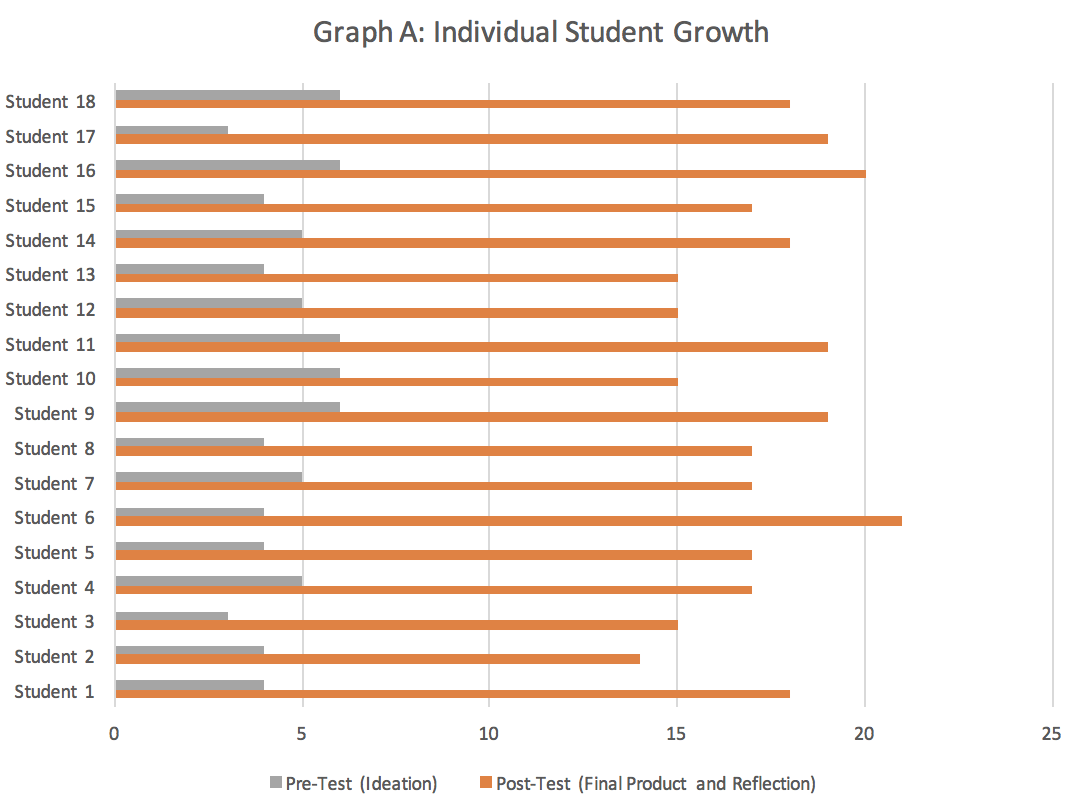
Graph A shows each student progress from the beginning to the end of the unit.

Graph B compared pre- and post-assessment scores between students in the first half of the alphabet compared to students in the second half of the alphabet. This was based on first names only, as last names were not disclosed to us.
Discussion of Pre-and Post-Assessment Results
In Graph A, student growth between pre- and post-assessments can be determined by how long each bar is in comparison to the other students. For examples, students 6, 9, 11, 16, and 17 had the highest post-assessment scores. However, student 6 and student 17 had lower pre-assessment scores compared to students 9, 11, and 16. This indicated that the knowledge they gained from the assignment increased their post-assessment scores significantly from their pre-assessment scores, indicating that there was a small curve of growth. If there was no growth, then student 6 (who had the highest post-assessment score) would've also had the highest pre-assessment score. But students 9, 10, 11, 16, and 18 had the highest pre-assessment scores. When it came to the pre-assessment scores, there are also not as many distinct jumps between students compared to their post-assessment scores. While most of our students started out with roughly the same prior knowledge on the content of our lessons (specifically when it came to technical drawing skills and conceptual planning), the post-assessment results determined that some students had a larger spike of knowledge than others. However, the difference is extreme in only a few cases.
Graph B indicates that students in the first half of the alphabet had lower scores on both the pre-and post-assessment compared to the second half. However, there is not a significant difference between the data. This means that students' prior knowledge of information from the ideation and the execution of the final product remains relatively consistent when clustered together. There are no distinct variables besides letter placement in the alphabet. We were not able to assess boys versus girls because there were slightly more girls than boys, which would've skewed the data in favor of girls performing better than boys. We also were not able to assess grade level, since we were not told which students were second graders and which were third graders.
Graph B indicates that students in the first half of the alphabet had lower scores on both the pre-and post-assessment compared to the second half. However, there is not a significant difference between the data. This means that students' prior knowledge of information from the ideation and the execution of the final product remains relatively consistent when clustered together. There are no distinct variables besides letter placement in the alphabet. We were not able to assess boys versus girls because there were slightly more girls than boys, which would've skewed the data in favor of girls performing better than boys. We also were not able to assess grade level, since we were not told which students were second graders and which were third graders.
Strengths and Weaknesses of Assessment
Strengths: Our priority with assessing student growth in the rubric was determining if students acquired basic drawing and design skills, as well as how comfortable they were working with unfamiliar materials. This was because our second and third grade students cared a lot more about playing and experimenting with the materials rather than heavily planning their concepts out. Our assessment of their conceptual interpretation of the assignment was based more on creative risk-taking and our ability to clearly read their intent based on their ideation sketches. Technical skills were not a large factor for communicating concept well. We also took great care that the rubric not only met all of our objectives, but rewarded students points based on the five art learnings. We felt that this made rewarding points more about process and product than just strictly product.
Weaknesses: We did not feel that a quantitative graph really captured the essence of student growth throughout the unit compared to the qualitative data we gained from our formative assessments. This is because pre-assessment in our elementary art class was heavily based on verbally processing things out loud and critically thinking about art with a group rather than a worksheet that had them fill out questions. Also, based on the little amount of time Emily and I spent at Polaris, we felt that expeditionary and experiential learning is a lot more qualitative than it is quantitative. Though the graph does show student growth between pre- and post-assessment scores, it does not detail the differentiated growth each student went through or the profound insights they made during the art-making process. These are the things that might have a stronger impact for the success of teaching a unit at a school like Polaris, compared to a public school.
Weaknesses: We did not feel that a quantitative graph really captured the essence of student growth throughout the unit compared to the qualitative data we gained from our formative assessments. This is because pre-assessment in our elementary art class was heavily based on verbally processing things out loud and critically thinking about art with a group rather than a worksheet that had them fill out questions. Also, based on the little amount of time Emily and I spent at Polaris, we felt that expeditionary and experiential learning is a lot more qualitative than it is quantitative. Though the graph does show student growth between pre- and post-assessment scores, it does not detail the differentiated growth each student went through or the profound insights they made during the art-making process. These are the things that might have a stronger impact for the success of teaching a unit at a school like Polaris, compared to a public school.
